Monday, December 31, 2012

MFT January Guest Designer Challenge

I picked up the new Crate Paper Fourteen paper pad the other day and finally had time to play with it this morning.  You know that when I have designer paper on my desk, the first step is to check out My Favorite Things sketches!


This is the sketch for the January Guest Designer Challenge and my starting point for this card.


The sentiment from the Complimentary Greetings stamp set is inked with Color Box Chianti and stamped onto a panel die cut from the largest die in the Die-namics Well Worn Greetings set.


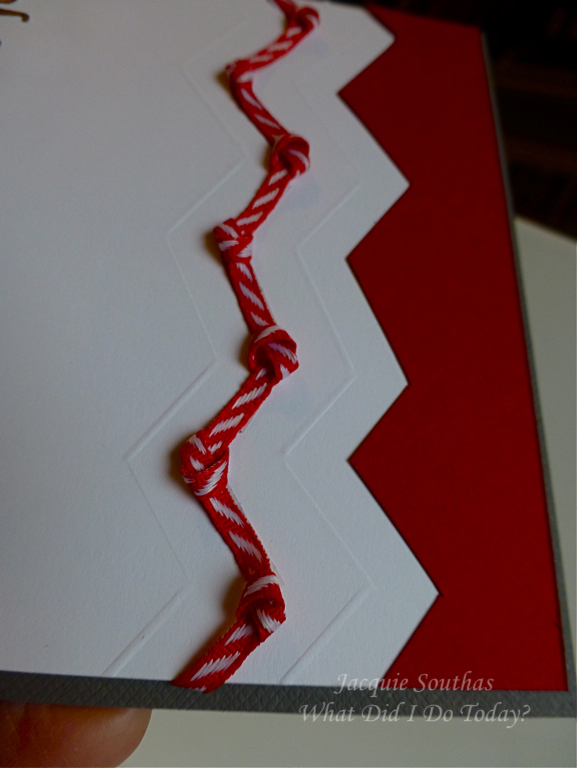
The edges of the sentiment panel are inked with Worn Lipstick Distress ink and popped up on a rectangle cut from the same patterned paper. I didn't want to introduce another pattern and liked the idea of lining up the chevron. A few pearls add interest to the tips of the chevrons.

The large heart is a Fiskars punch and the smaller hearts are cut using a die from Die-namics LLD Accent  It - Calendar Components.


I love the Die-namics Dainty Bows and cut the little one in Bubblegum felt, with a button and bakers twine finishing it off.

I don't make too many cards these days without pulling out my Die-namics Fishtail Flag Stax - one of my all-time favorite dies!

To join in the fun over at the MFT Forum at Splitcoast Stampers, create a card based on the sketch and enter for a chance to win a fabulous prize!

I am also linking this card to Simon Says Stamp where the challenge this week is Anything Goes.

Thanks for stopping by,

Jacquie


Saturday, December 29, 2012

Ribbons & Stars

I have my final Guest Designer post up over at Really Reasonable Ribbon today, so stop by and take a peek.

Here is a little teaser.


I used a great ribbon that RRR carries called Textured Two-Tone Ribbon in Gold/Antique Gold. It is double-faced, which I love because I don't have to worry about turning it front to back like I needed to on this card.

Thanks for stopping by,


Jacquie


Wednesday, December 26, 2012

Papertrey Ink December 2012 Blog Hop

Thanks for coming by to check out my contribution to the Papertrey Ink December 2012 Blog Hop!

This month Nichole Heady challenged everyone to create a White on White card, providing these wonderful inspiration photos. If you didn't come here from Capture the Moment, head over there for details and links to join in the fun.


December-inspiration

The wall of frames in the bottom left corner was the starting point for my card. 


First I created a cardstock and white satin double ruffle ribbon frame - it is a ittle hard to tell in the photo, but this frame is popped up with foam adhesive and sits on top of the embossed base panel.

A Half & Half die cut provides a home for the gold heat embossed sentiment from the Mega Mixed Messages stamp set. This panel is attached to the ribbon frame.

To dress up the card a bit, I went to my stash of pearls, flowers and beads.


I touched a few of the petals with Glossy Accents and poured a little between the pearls and flowers. This is the perfect medium to hold clear beads and Martha Stewart crystal micro beads in place.


There is a little more contrast between the white ribbon & cardstock and the pearls & flowers than I was hoping for, but I still think it is close enough to White on White for the challenge!

My plan is to send this card in a padded envelope for my mother-in-law's 80th birthday next month.

I'm off to hop around and see what everyone else has created.

Thanks for stopping by,


Jacquie

Monday, December 24, 2012

Colour Q #168 + CAS-ual Friday 10 Minute Dash

While baking cookies yesterday, I decorated a few kraft gift bags. The cookies baked for 10 minutes and I found I could get a couple of bags put together while the cookies were in the oven.

I didn't time each bag, but know they were all under 10 minutes which would qualify them for the CAS-ual Friday Challenge to make a holiday card in under 10 minutes.

cfc83
CFC83: Create a CAS holiday card in less than 10 minutes!
Gather your thoughts, then gather your supplies, and when you're ready, set the timer for just 10 minutes and
 GO!


Well technically, these aren't cards, but for most of the recipients they are the only holiday greeting we give them - not sure if that means they count or not?

Because the CAS-ual Friday Challenge is teaming up with the 10 Minute Craft Dash, I am also linking to their challenge.
Cd_9_large


I made seven bags, but one of the recipients showed up at our house early this morning before I took the group shot.


For this bag, I used the color palette from Colour Q Challenge #168.


All of the tags were cut & stamped in the time frame. Some of the snowflakes were already on my desk from an evening of borrowing die cuts a few weeks back & a few were punched yesterday. The ribbon is super fast to adhere to the bags. I run a line of score tape all the way around and then attach the ribbon, cutting it when I get to the end so no time is spend measuring and cutting before applying.

The embellishment that takes the longest is attaching the bells to the tags!

Thanks for stopping by,

Jacquie

Sunday, December 23, 2012

Peace on Earth

I still enjoy sending out a mass Christmas card every year. This is the card that goes to the extended family and friends that we don't get to see very often, but want to include a photo or two and a little bit about what we are doing. I really do enjoy planning, designing and completing this task - it is just in the middle part of the production that is a challenge!

Because we send out around 75 of these, the goal is always to make something stress free and easy to produce. Let's see if you can spot the problem with this year's card.


Let's see, the main panel is cut from Teresa Collins' Christmas Cottage Music paper and the edges inked with Tim Holtz Barn Door Distress Ink (easy).  A spot near the bottom of the panel is lightly painted with a dry foam brush to make a home for my favorite sentiment from My Favorite Things Inspired By Christmas stamp set inked with Barn Door (easy, just need drying time between paint & ink).

The MFT Winter Wreath is die cut twice from green cardstock and a trio of red gems finish it off. I love this wreath die, but after cutting 150 or so of these I am ready to put it away until next year.

The first few dozen went weren't bad - I knew it was going to take awhile to get the number I needed - but then the wreaths stopped releasing from the die easily. I was losing a few as they ripped and really didn't want to be cutting any more than absolutely necessary.

When punches get sticky or difficult, I've used aluminum foil and wax paper to sharpen and lubricate them, so decided to try this with the die. What a difference the wax paper made! My wreaths were releasing easily again and when things started to get sticky after another couple dozen, I just cut a few wax paper wreaths.


Our Christmas letter is the base of the card. I wrote the letter in Word and printed it with a landscape orientation so that 2 letters printed on each page.  The page are cut in half and scored in the middle forming a card base. A photo of my kids and the beautiful Bella (technically not ours, but this is her second home) is taped to the inside.

This card is being entered in the Simon Says Stamp Challenge Anything Christmassy.

The only thing left on my Christmas/Holiday list is putting together a few treat bags. I decided just to make one cookie this year - Candy Candy Blossoms.

This is the first batch of cookies I made on Friday and they look pretty good.


I am so glad I took that photo, because this is what the batch I made this morning looks like!


The first batch was rolled in coarse red & white sugar and the second batch in crushed candy canes, but that should not have made a difference in one batch being so much flatter than the other?!

Another batch is in the oven now, so hoping it comes out looking good enough to give away.

Thanks for stopping by & happy holidays to everyone!

Jacquie


Thursday, December 20, 2012

Tied up in Knots - Really Reasonable Ribbon Tutorial

I have a post and tutorial up at Really Reasonable Ribbon today, so stop by and say hi and maybe do a little holiday shopping while you are over there.

I had a couple of questions about how I tied the ribbon on tag 18 for my Snowflake & Ribbon Tag Advent Calendar you can see here.


This ribbon wreath is made by tying 5 simple knots in the same direction. If you are a visual learner like me, head over to RRR and take a look at the step by step photos I have posted there.

The simple knot is a great way to manipulate ribbon into shapes on your cards. This same technique is used to create this heart out of the double-faced hot pink satin ribbon. A few more details and the steps are over at RRR.


The designer paper is from the Basic Grey Kissing Booth line, The sentiment panel is made up of a Spellbinders Label Ten, Fiskar's heart punches and a PTI sentiment and die.

Just to really demonstrate the versatility of this technique, I knotted a piece of the red diagonal stripe ribbon into a chevron for this card.


I want to highlight the chevron shape, and knew the CAS-ual Fridays Challenge this week is to feature scoring, so scored another chevron line below & above the ribbon. A piece of red cardstock is also rough cut with the chevron shape to border the bottom of the card. The sentiment is created with LilyBee Alphabet stickers and a punched heart.


CFC82: Create a CAS project that features scoring...
                                        and no, the fold on your card does not count *wink*


You can really see the score line here.


Thanks for stopping by,

Jacquie

Wednesday, December 19, 2012

Sweet Sunday Sketch Challenge #174

I made the right decision staying home and out of the rain yesterday - today the sunshine is back, but baby it is COLD! Cold enough we had to thaw the windshield before heading off this morning. While I wait for it to warm up a bit, I thought I would post one of the birthday cards I made yesterday.


As much as I love clean and simple cards, and really want to master that style, I also love to play with patterned papers.

For this card I used the current sketch from Karen Giron's Sweet Sunday Sketch Challenge.


I went to a few different MFT product for this card. The spinner and a couple of stamps are from Game Night, a couple of stamps from Let's Toast and the birthday sentiment is from ALM Birthday Girl. I also used the Open ZigZag border and Oval Tab die-namics. All the designer paper is from the Carta Bella Traditions paper pad. 


A little Baker's Twine is tied with a key dangling from it. My dear daughter has a lot of friends turning 16 this year, so I did make this hoping she would choose to use it. 

There is a definite trend to much bigger parties this year, with an extended group of friends being invited instead of just their small, core group. Thankfully we haven't seen anything too over the top - for the most part they want to hang out, listen to music and eat. 

thanks for stopping by,

Jacquie

Tuesday, December 18, 2012

Make It Monday #96 - Patchwork Die-Cuts

It is a blustery, gloomy wet day here and I just don't have the desire to head out and work my way through my mile long list of errands. The forecast is better for tomorrow, so I decided to stay put and replenish my stash of thank you and birthday cards.

Melissa Phillips presented the tutorial and challenge at Capture the Moment this week, with a challenge to use up scraps and create patchwork die-cuts.

Most of my scraps right now are from Christmas & Holiday themed papers, but I was pleasantly surprised that, when I was done, this doesn't scream Christmas.


The papers are all from Teresa Collins Christmas Cottage line and die cut with the PTI Jar & Lid die. The three die cuts were stacked and then cut into 3 pieces. I shuffled the pieces around to reform the jar and then decided to use all three jars on the card.

I cut the Tiny Tags from the same kraft cardstock that makes the card base and then stamped three sentiments from the Mega Mixed Messages stamp set. These are tied to the jar with Martha Stewart green Baker's Twine.

The jars are sitting on a panel of Soft Stone cardstock die cut with the Edgers #2 die.

Thanks for stopping by,

Jacquie

Saturday, December 15, 2012

Really Reasonable Ribbon Challenge - Anything Goes

There is a new challenge up over at Really Reasonable Ribbon and this time RRR #62 Anything Goes plus Ribbon. You have until December 29th to play along - add ribbon(s) to any project, link it to the challenge and be eligible to win a great prize!

As the Guest Designer this month, I created a Christmas card. Yes, I still need a few more.


Look at that luscious, shimmery, silky ribbon!! I love that the photo captures the translucency as it extends past the card base. This is Silky Crush Champagne Ribbon and is a generous 1.5" wide.


This ribbon is sturdy enough to hold it's shape and thin enough to easily knot or tie into a bow. Trust me, you will not be able to stop adjusting and playing with it!


I didn't want to add to much else to the card - seriously, why would I want to cover up that ribbon? - so I took a few flowers from my stash and used them to anchor a sentiment from My Favorite Things Inspired By Christmas stamp set.

The designer papers are a scrap from an older Basic Grey Christmas line and Authentique Enchanted (yes, that is technically Halloween paper on a Christmas card - I refuse to be limited by labels when I find the right piece of paper). A Cuttlebug embossing folder adds texture to the larger panel.

Just because I can, I'm going to share another photo of the ribbon.


Now it's your turn - head over to Really Reasonable Ribbon and link your project up to the challenge!

Thanks for stopping by,


Jacquie

edited to add: 
In response to Marcie's question, I really think this ribbon will survive being mailed. I usually make my square cards 5x5 and mail them in a 5.5x5.5 envelope to give a little extra room for any bulk. This size does require extra postage, so I take it to the post office to be hand franked anyway (meaning it doesn't get stuffed through the automatic franking machine and squished). This specific card has been sent to my mother-in-law, but was sent in a bigger package.

Friday, December 14, 2012

Make it Monday #95 - Layered Glitter Shapes

I took a break from the Christmas preparations to watch the Make It Monday tutorial at Capture the Moment. This week Heather Nichols presented a fabulous idea for layering glittered die cuts.  I have been frustrated trying to adhere something to a glittered base, so loved her technique!

I took the idea to an extra level, glittering both die cuts that were layered.


I have loved using the Tag Sale #4  die as an ornament on many cards this year and die cut another one today. I also die cut both sizes of the chevron border die.


I followed Heather's instructions and ran the border pieces through my Xyron and then sprinkled glitter over the adhesive side. I then ran my tag through the Xyron and then adhered the glittered chevron pieces to the adhesive side of the tag. White glitter was then sprinkled over the tag and stuck to the remaining exposed adhesive parts of the tag.

This tag has an impressed circle that did not really pick up the Xyron adhesive, so I added a line of Rock Candy Stickles to fill the circle.

A few stray pieces of glitter ended up in the wrong place, but I am amazed that most of it is exactly where I wanted it! A ribbon bow and bells are added and the tag is popped of the Smoky Shadow base with foam adhesive.


The stamped sentiment is from Think Big Favorites #9 and looked a little flat against the glitter. It was too late to heat emboss, so I went to Erin's Make It Monday #94 tip from last week and ran a glue pen over the sentiment. The white glitter adds just the right amount of sparkle.

I LOVE this layered glitter technique - thanks Heather!

Thanks for stopping by,

Jacquie


Thursday, December 13, 2012

Really Reasonable Ribbon December Blog Hop


Welcome to the Really Reasonable Ribbon December Blog Hop! I am thrilled to be the Guest Designer this month.

You should have come here from Bonnie's blog, but if you got lost on the way or want to go back to the beginning, head over to Really Reasonable Ribbon Ramblings.

The Design Team is featuring projects made with the ribbon selection from the Monthly Ribbon Club.


Monthly Ribbon Club, Domestic


Just look at the gorgeous assortment of colors & textures we had to work with!

I have been wanting to make a non-traditional tag Advent calendar for a while, and when these ribbons landed in my mailbox I immediately went to work.


If you have been here before, you now that I like a sense of order in my projects, so all my tags are white and limited to three shapes (in a deliberate sequence LOL) and tied with a pink Baker's Twine. The numbers are die cut with an ancient Sizzix Alphabet die, Block Party, in two colors. 

I also had on hand numerous die cut snowflakes in various shades of pink and blue cardstock, vellum and felt.

For the first dozen or so tags I just pulled ribbon from the package and tied bows, knots, twisted and layered without too much thought.

For remaining tags, I paid a little more attention to balancing the colors and decided to work with only the ribbons I had already used. In the end, seven of the nine ribbons from the collection are on the tags. I LOVE that they co-ordinate with no effort on my part!


Just a few close-ups of my favorites.


This is seriously like trying to pick a favorite child - I just can't seem to narrow it down!


OK, I'll stop now LOL!

All the tags are doubled up for extra stability, which also allowed the ribbon ends to be hidden on a few of the tags.

I would love to hear which is your favorite and why!

There is still plenty of ribbon left and, with two nieces and a cousin expecting in the spring, don't be surprised if you see these ribbons on baby cards in the near future.

Now it is time to head over and see what beautiful project Cheryl has created for us this month.

Thanks for stopping by,

Jacquie

Edited to add:
The wire card hanger came from a local scrapbook store (Paper Tales in San Diego) and was very reasonably priced (under $15?) - this time of year I would keep an eye out for a holiday card holder on sale.

Wednesday, December 12, 2012

Happy Birthday & Name Day Baby Boy

My dear son turns 14 today - his dear sister keeps saying "it would be cool if you were turning 12", given that it is 12/12/12, but I wasn't thinking that far ahead when family planning. In fact, he surprised us in a couple of ways and wasn't supposed to show up until after Christmas.

For any Greek Orthodox readers out there, he was also born on his Name Day - the Greeks don't traditionally celebrate a birthday, but have big parties for their Name Day instead. My dear husband and I joke that the only prenuptial agreement we made was any children would be named in the Greek tradition which is to name them after the grandparents, so dear son was going to end up with his name no matter what day he was born.

Looking back, I wonder if my dear mother-in-law fed me something to ensure dear son would be born on his Name Day. We had dinner at her house and ten hours later dear son appeared LOL - although, in fairness we didn't know the gender, so maybe this is all a wild coincidence.

I made a couple of cards a while back and dear daughter snagged my favorite, which I don't think I've shared before since it wasn't made for a challenge.


The designer papers are all from the Echo Park Note to Self 6x6 pad and the numbers are die cut using my old Sizzix Block Party Alphabet (it really is an oldie, but goodie). I layered the 1 and 4 and popped them up with foam tape. A Papertrey Ink sentiment is stamped in the corner.

Thanks for stopping by,

Jacquie


Monday, December 10, 2012

MFTWSC101 Snowflake Peace

While my dear family was out shopping yesterday, I was supposed to be working on our mass production Christmas cards. I usually get these done over Thanksgiving weekend, but this year we had company and I can't believe I am this far behind?! I need to make close to 100 of these, so the design has to be fast & easy to put together and relatively flat for mailing.

I also have a bit of a reputation for writing a non-traditional family brag letter and haven't figured that out either for this year. My self-imposed rule is to not repeat the format so options like Haiku and confidential Santa files are off the table.

So with time & supplies ready, what did I do?


Made a card based on the My Favorite Things Weekly Stamp Club sketch {grin}. I had this lovely MFT snowflake die cut in MFT felt and just had to get it off my desk before working on what I was supposed to be doing.


The small snowflakes are also cut with MFT die-namics and the sentiment panel is a Fishtail Flag Stax and Layers die-namic that I cut both ends.


The sentiment is from the MFT Inspired by Christmas stamp set and inked with Memento Rich Cocoa, ivory pearls are Queen & Co - the aqua ones have just been colored with a Copic marker and the designer papers are Studio Calico Wonderland.

I also used a gorgeous aqua Diamond Satin Ribbon that is in this month's Ribbon Club assortment from Really Reasonable Ribbon.

Monthly Ribbon Club, Domestic


Thanks for stopping by,

Jacquie

Sunday, December 9, 2012

Gift Wrapped Cards with Really Reasonable Ribbon

First, I have to give a huge thank you to Bonnie at Really Reasonable Ribbon for asking me to Guest Design this month. Head over there to check out my first blog post!

My eye is always drawn to clean, graphic design, so it isn't any surprise that I used the Chevron Striped Twill to make a few holiday cards.

My biggest challenge was deciding which colors to use, but I was able to narrow it down to three: red, turquoise and celery (what, you thought I was just going to pick one?).


I wanted to create cards that looked like they were gift wrapped packages, with the sentiment on a tag. Just like the packages under our tree, each ribbon is tied a different way.

The red Chevron Striped Twill is folded back on itself to form a ruffle.


The celery Chevron Striped Twill runs along the top and right side of the package, with a bow added where the ribbon intersects.


The turquoise Chevron Striped Twill also runs along the top and right side of the package and is knotted off where the ribbon intersects.


This card is also being linked to the CAS-uals Fridays Challenge to feature knots.

cfc81
CFC81: Create a Clean And Simple project that features a knot or knots.


Each packages is finished with a Papertrey Ink sentiment and tied to the ribbon using Really Reasonable Ribbon's solid color Baker's Twine, along with a few jingle bells.

The designer papers are from Studio Calico's Wonderland collection.

Really Reasonable Ribbon has a terrific sale going on right now through until December 11th. Check out the details here and fill your shopping cart!

Thanks for stopping by,

Jacquie